How to download bank statements and upload payment orders. How to download bank statements and upload payment orders How to upload from a bank client in 1c
Thanks to the progress and development of technology, the accountant no longer needs to manually post the final bank statement in the program. Technologically, Accounting 3.0 makes it possible to automatically download statements from a client bank into the program.
Data from the bank is accepted in two stages. At the first stage, the statement is received in the bank program and compiled into a file. At the second stage, the extract is loaded into the 1C Accounting program.
For example, we will look at step-by-step instructions for uploading an already generated bank statement from the iBank program to the 1C Accounting 8.3 program.
STEP 1: Open the iBank program: on the main panel in the settings, select the “General” tab
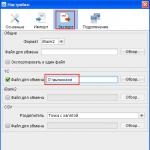
STEP 2: In the window that opens, select the “Export” tab, use the mouse to open the window and begin the settings. In section 1C, put a checkmark (we check that there are no checkmarks anywhere else), and next to it we write the path to the file for saving the extract with the txt extension. At the bottom of the window, click the “Save” button

Fig.2
STEP 3: Now you need to select statements for the required date (if statements for a long period are loaded, general selection is possible using the key combination Ctrl + A). On the main panel, next to the Out button, select the down arrow and from the list that opens, select the “Export to 1C...” function.

Fig.3
The statements were generated into a file (the path to which we specified in step 2)
STEP 4: Before loading the statement into the program for the first time, it is strongly recommended to make a backup copy of the program! And you also need to check the list of counterparties in the database. Since the extract from the client bank is pulled into the database according to the TIN. If the directory contains counterparties with the same TIN, an error will occur when uploading the statement, since the program will not know who to link the statement to.
STEP 5: In the 1C program, on the main panel, select the “Bank and Cash Office” section, on the left side go to the “Bank Statements” item.

Fig.4
STEP 6: Double-click the mouse to open the “Bank Statements” journal on the panel at the top and click the Download button.

Fig.5
STEP 7: A window for contacting the bank opens on the screen. Select the "Upload to 1C: Accounting" tab and fill in all the necessary data: the path to the file (the one specified in step 2), and select a bank account.

rice. 6.
At the bottom of the window, click the download button.
The statements are loaded into the program. Check the download report by clicking the "Download Report" button at the bottom.
On a note: If the recommendations below are not clear to you, and you need to configure it, then I recommend contacting us - Smart1C.ru. We will quickly configure the bank client for any 1C configuration.
All settings for exchange with a bank in the 1C: Accounting 8 program are placed on a single form. In order to set up the exchange of data on a bank account with the Client-Bank program, in the 1C: Accounting 8 program (rev. 3.0) perform the following steps:
For your information- for individual full-fledged work on the trading market, I recommend using the free Forex program. The program implements charts and contains economic market reviews necessary for analysis and decision-making.
In the program “1C: Accounting 8”, to reflect the payment received, the document “Receipt to the current account” with the transaction type “Payment from the buyer” is used, and to reflect the payment, the document “Write-off from the current account” is used. All these documents can be viewed by clicking on the menu tab - “Bank and cash desk” - “Bank statements”.
At this point, the client-bank settings from the Accounting 3.0 side are completed. All that remains is to work in it correctly, performing the exchange - loading/unloading.
The principle of working with a client bank comes down to the following actions:
- Open the processing “Exchange with the bank” - “Bank and cash desk” - “Bank statements” - the “More” button - “Exchange with the bank”;
- When you receive payment from the supplier, you export the file from the client bank to 1C - “Exchange with bank” - “Download bank statement” - “Download” button, the document “Receipt to the current account” automatically appears;
- If you need to pay a supplier, you create a new counterparty in the “Counterparties” directory, enter their “Bank Accounts” data, then in the program create a new document “Write-off from the current account” with the transaction type “Payment to the supplier”, post it, export this document from 1C programs - “Exchange with the bank” - “Send to the bank” - “Unload” and import into the Client Bank. Thus, you will have a 2-way exchange: 1C programs and Client-Bank.
Video - Client bank in 1C 8.3 setting up, uploading and downloading statements
How to download statements from a client bank into 1C Accounting 8.3 (revision 3.0)
2016-12-07T18:26:50+00:00It’s the 21st century and I’m surprised to learn that some accountants still enter bank statements into 1C: Accounting manually, although in all programs of the 1C family (starting with 7) this process is automated.
And if in 1C 7.7 there were still complaints about it, then the mechanism for loading bank statements for 1C: Accounting 8.3 (revision 3.0) truly deserves all praise.
I’ll tell you step by step how to download statements from your client bank (using the example of the iBank system as the most common now) into 1C: Accounting 8.3.
1. Launch the client bank. From the main menu, select "Settings" - "General".
2. In the settings that open, go to the "Export" tab. Check the box in section 1C and uncheck all other sections. As an exchange file in section 1C, enter any path to a file with the extension ".txt". Click the "Save" button.

3. Now get statements for the required date, select them all (key combination Ctrl+A) and select the down arrow next to the button in the panel Out. From the list of commands that opens, select "Export to 1C...".

4. Half the battle is done! The statements were uploaded to the same file that we specified in the client bank settings.
Making a backup copy of the database
Loading from a file into the database
5. Now launch 1C and go to the “Bank and Cash Desk” section. And then select "Bank Statements" in the panel on the left.

6. In the statement log that opens, click the “More” button and select “Exchange with bank” from the drop-down list:

7. An exchange window with the bank has opened. Select the "Load from Bank" tab.
Specify the bank account and the file into which statements from the client bank were downloaded:

8. In the bottom panel, click the "Download" button. And all extracts from the file will be uploaded to 1C.

9. Done! All that remains is to view the “Load Report”.

Sincerely, Vladimir Milkin(teacher and developer).
We regularly have to explain to accountants how to generate payment orders in a client bank, and also enter them into 1C programs again. To avoid double tedious work, just set up a simple transfer - loading bank statements into the program. The complexity of this operation is small for any accountant, and he is able to cope with it on his own and figure it out.
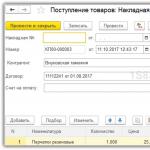
In a programme 1C:BP 8, edition 3.0, open the section Bank and cash desk and choose Bank statements.
In the window that opens, click the button Download and fill in the details of our Organizations and her Bank account, then press the button Settings. If after filling in the details Organizations the program displays a message,

then let's press Open settings.
Here we will select the program name from the drop-down list and specify the file to download.
To generate the required file, you need to go to your banking program, find a service for uploading data to 1C and create the necessary file.
Due to the huge diversity of bank clients, it is not possible to describe this to everyone. As a rule, you need to find the “Data Export” menu item and select export to 1C there. You can get more precise instructions by consulting your bank’s technical support or on the bank’s website.
In any case, when uploading a file, you will need to indicate the folder into which the file will be uploaded (remember it). In the future, in 1C you will need to enter the path to the folder in the “Upload file to 1C: Accounting” field.

The name of the file itself may differ from (kl_to_1c.txt). The “Upload file” field is filled in if you plan to initially enter outgoing payments in 1C, and then upload them to the client bank through this processing.
I also recommend unchecking the “Automatically run after downloading” checkbox. When the checkbox is enabled, documents are processed immediately, and you may miss something important. I advise you to go to each of them and conduct them yourself.

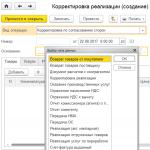
If you have done everything according to the instructions, then the settings have been made and the data file has already been downloaded from the client bank, then click the “Update from statement” button. Enjoy viewing the list of payment orders, focus on the “Type of transaction” column, then make the necessary corrections, if necessary, and click the “Download” button.
All! You can open bank statements in 1C and check/post downloaded documents.