How to make a simple electromagnet - step by step instructions with diagrams. How to make an electromagnet Motor from battery wire and magnet
In order to make strong electromagnet , take an excellent magnetic core, wrap it with an insulated conductor and connect it to a current source. The power of such electromagnet but it is allowed to regulate by different methods.
You will need
- a piece of low carbon electrical steel cylindrical shape, alienated copper wire, continuous current source.
Instructions
1. Take a workpiece made of electrical steel and carefully, turn to turn, wrap it with insulated copper wire. Take a wire of medium cross-section, so that it can fit as much as possible more than turns, but at the same time not too thin, so that it does not burn out from large currents.
2. Later, connect the wire to a continuous current source through a rheostat, if the source itself is not likely to adjust the voltage. For such a magnet, a source is absolutely sufficient, one that produces up to 24 V. Later, set the rheostat slider to the highest resistance or the source regulator to the minimum voltage.
3. Slowly and deliberately increase the tension. In this case, a characteristic vibration will appear, accompanied by a sound, the one that is allowed to hear when the transformer is operating - this is typical. Be sure to control the temperature of the winding, the duration of operation depends on it electromagnet a. Bring the voltage up to the point where the copper wire starts to heat up obviously. Later, turn off the current and let the winding cool down. Turn on the current again and with the help of such manipulations find the highest voltage at which the conductor will not heat up. This will be the nominal operating mode of the done electromagnet a.
4. Bring a body made of a substance that contains steel to one of the poles of a working magnet. It should firmly adhere to the magnet's nickel (we consider the base of the steel core to be the nickel). If the pulling force is not satisfactory, take a longer wire and lay the turns in several layers, increasing the magnetic field proportionally. In this case, the resistance of the conductor will increase, and it will need to be adjusted again.
5. To make the magnet more cool to attract, take a horseshoe-shaped core and wrap a wire around its straight sections - then the surface of attraction and its strength will increase. In order to increase the force of attraction, make a core of an alloy of iron and cobalt, the conductivity of the magnetic field of which is slightly higher.
People long ago noticed that when an electric current was passed through a coil wound from a metal wire, a magnetic field was created. And if, to put inside this coil any metal, ferromagnet (steel, cobalt, nickel, etc.), then the effectiveness of the magnetic field increases hundreds, or even thousands of times. And so it was born electromagnet , one that in our time is a necessary part of many electrical devices.

You will need
- Nail, pliers, enamelled wire, cambric (wire insulation), power supply, paper, electrical tape.
Instructions
1. Take a thick nail and bite off the sharp tip with pliers. File the cut point so that the end of the nail is even and smooth. After that, burn it in the stove, let it cool in the air and clean it from carbon deposits.
3. Take the enameled wire and wind it tightly around the cambric, when you wind one layer, wrap it with paper and wind the next one. The more you wind the turns, the greater the effectiveness will be. electromagnet a. After the end of the winding, bring the wires out, wrap the final layer of the winding with paper and wrap with electrical tape. Clean the ends of the wires from enamel and connect them to a power source, electromagnet will attract metal objects to itself.
Related Videos
Note!
Do not connect a nail-based electromagnet to 220 volts.
Useful advice
It is more excellent to use continuous current than anyone, the effectiveness will be greater. For alternating current, it is appropriate to make the core made of electrical steel, say from a dilapidated transformer, in order to minimize eddy currents arising in it. The larger the core area, the more effective the electromagnet.
The source current a device is called where there is a reforming of energy of some kind into electrical energy. In it, work takes place, which is based on the distribution of correctly and negatively charged particles that accumulate at the poles of the source.

You will need
- carbon rod, ammonia, paste, zinc vessel, galvanized steel, table salt, baking soda, coins, lemon, apple, voltmeter, galvanometer
Instructions
1. Make a chemical source current , in which, due to chemical reactions, the internal energy will be converted into electrical energy. An example of this is a galvanic cell, where a carbon rod is inserted into a zinc vessel.
2. Place the rod in a linen bag, fill it in advance with a mixture of coal and manganese oxide.
3. Use a flour paste in the element with a solution of ammonia. During the interaction of zinc with ammonia, the carbon rod acquires the correct charge, and zinc - negative. An electric field will arise between the zinc vessel and the charged rod. In this source current the positive electrode will be coal, the negative electrode will be the zinc vessel.
4. Make a battery by combining several similar electrochemical cells. Sources current on this basis, they are used in UPS, as well as in household independent electrical appliances. On their basis, batteries are produced for cars, electric vehicles and cell phones.
5. Take an electric lamp without a glass bottle, screw it into the holder, fixed in advance on the stand. Combine with galvanometer. If you heat the junction of the spiral with the wire with a match, the device will indicate the presence current .
6. Take an apple or lemon and stick a copper wire into it. Attach galvanized steel at a short distance. You will get a battery, i.e. galvanic cell. If you measure the voltage on this battery with a voltmeter, then it will be about 1 V. It is also possible to make a huge battery by connecting the elements in steps.
7. Take five "white" and "yellow" coins. Spread them out alternating with each other. Place gaskets between them, made of newspaper, previously soaked in a solution of traditional table salt. Place them in a column and squeeze. By connecting a voltmeter to the first "white" and the last "yellow" coin, it is allowed to find the voltage, and by touching it, even get a slight electric shock. All metal parts must be cleaned of grease in advance.
Related Videos
Making strong electro magnets Is a difficult technical challenge. In industry, as, in fact, in everyday life, magnets are needed enormous power. In a number of states, magnetic levitation trains are even working closer together. Cars with an electromagnetic motor will soon appear in large quantities under the Yo-mobile brand. But how are high power magnets created?

Instructions
1. It should be noted right away that magnets are divided into several classes. There are continuous magnets - these are, as usual, pieces of a certain metal and alloy, possessing a certain magnetism without outside influence. And there are also electromagnets. These are technical devices in which a magnetic field is created by conducting an electric current through special coils.
2. From continuous magnets only neodymium can be classified as strong. At a relatively small size, they have primitively stunning magnetic collations. First, they lose their magnetic properties only by 1% in a hundred years. Secondly, with relatively small dimensions, they have a large magnetic force. Neodymium magnets are made unnaturally. To create them, you need the rare earth metal neodymium. Steel and boron are also used. The resulting alloy is magnetized in a magnetic field. As a result, the neodymium magnet is ready.
3. In industry, strong electromagnets are used everywhere. Their construction is much more difficult than that of continuous magnets ... To create a strong electromagnet, a coil is needed, consisting of a winding of copper wire and an iron core. The strength of the magnet in this case depends only on the strength of the current conducted through the coils, as well as the number of turns of the wire on the winding. It should be noted that at a certain current strength, the magnetization of the iron core is subject to saturation. Consequently, the strongest industrial magnets are made without it. Instead, a certain number of turns of wire are added. In most strong industrial magnets with an iron core, the number of wire turns rarely exceeds ten thousand per meter, and the applied current is 2 amperes.
In fact, every home craftsman began his acquaintance with physics in childhood with the construction electromagnet ... If your son is growing up, it's time for him to assemble this simple device together with you, after which he will probably be interested in science and technology and in the future will also become a home craftsman. And you will probably be interested in remembering your childhood.

You will need
- Several meters of insulated wire
- Insulating tape
- Nail
- Soldering iron, solder and neutral flux
- Nippers
- Two AA batteries and a compartment for them
- Bulb 3.5 V, 0.26 A
- Switch
- Paper clips
Instructions
1. Take a nail and wrap it with a layer of electrical tape so that only the cap remains open.
2. Take a few meters of insulated wire and wrap it around the nail in bulk.
3. Strip the ends of the wire. Combine the battery compartment, the lamp and the resulting electromagnet in steps.
4. Insert the batteries into the battery compartment and turn on the switch. The lamp will light up.
5. Make sure the nail has started to pull the staples towards it.
6. The nail is made of soft magnetic steel. This means that, even if it saves residual magnetization, it does not last long. Later, after you turn off the electromagnet, it will rapidly lose its ability to attract paper clips. There are also hard magnetic steels. A product made of such steel, once magnetized, then preserves this quality for a long time.
7. Magnetize with support electromagnet paperclip. It should retain magnetization longer than a nail. The screwdriver saves it even longer. In some cases, a magnetized screwdriver is much more comfortable than a non-magnetized one. But keep in mind that not everyone likes to use such screwdrivers. On the other hand, magnetized screwdrivers seem to be too uncomfortable for some home craftsmen.
8. Conduct this skill. Bring a paper clip to the electromagnet - it will be attracted to it. Bring another to this paperclip, and another to it, thereby making a chain of clips. The paper clips will stick together until you unplug the electromagnet. Later, however, it is turned off, the chain of paper clips rapidly disintegrates.
9. The speed of magnetization and demagnetization of steel products is influenced by mechanical stress. Make sure of it like this. Turn on the electromagnet, lightly tap on the head of the nail, then turn it off. The magnetization will last a little longer. If you knock on the head of a nail when the electromagnet is turned off, it will demagnetize faster.
10. Bring a continuous magnet that has approximately the same strength as the electromagnet near the electromagnet. Make sure that opposite poles of magnets attract, and that of the same name repel. By changing the polarity of the power supply electromagnet , you will find that its poles are also swapped.
11. Please note that, being switched on through an electromagnet, the lamp slowly gains brightness, and when the switch is opened, a spark jumps between its contacts, which is not tracked without electromagnet ... This manifests itself as a so-called self-induction. What it is, your son will learn in high school in physics lessons, or, if it is more exciting for him now, he will read it on the Internet.
Note!
Do not connect the electromagnet to the batteries directly, without a lamp. Do not touch the bare ends of the wires when the electromagnet is disconnected, so as not to get hit by the self-induction voltage.
Related Videos
What do you do when the electricity goes out in the dark? Most likely, you light candles and spend the evening waiting for the power to come on. And you can spend this time with benefit. For example, light up a room with a conventional magnet and wire, which will allow the lamp to work without electricity. Or make a motor that can work autonomously.
DIY electromagnetic motor
This homemade electric motor is easy to make from scrap materials at home. It should be noted that such a device can be used not only as an illustrative example, but also for its intended purpose, for example, by attaching a fan to the rotor.
For manufacturing you will need:
- Spoke;
- Thin metal plates;
- Bolts with nuts;
- Copper wire;
- A piece of plywood.
From a metal sheet 0.2 mm thick, we cut out 5 rectangular plates 40 by 15 mm. In all plates we make holes in the center and put them on the prepared knitting needle. Next, you need to fix the plates together with electrical tape.
For better rotor rotation, the ends of the spoke are sharpened, thus ensuring the least contact with the surface.
Then, on the axis, you need to fix a homemade current breaker, which is made of the metal from which the plates are made. The dimensions of the breaker are 3 by 1 cm. This plate is folded in half and put on the axle.
Next, we make the base from plywood. To do this, on a piece of plywood measuring 50 by 50 mm, we drill three holes (two for the bolts at the edges and one in the center for installing the rotor). We make a U-shaped holder for the upper part of the rotor from a metal plate. And in it we drill a hole in the center.
After that, for the manufacture of the stator, we cut out three plates from the metal that will connect the bolts in the lower part of the structure and make two holes for the bolts in them. We put these plates on the bolts, and insert the bots into the holes on the wooden platform.
Further, the bolts are wrapped with electrical tape, and a copper wire of 500 turns is wound around it. At one of the corners of the wooden structure, a holder for a contact breaker is attached. Electricity with a voltage of 12 volts is connected to the coils.
How to make a motor from a battery correctly
This electric motor is rather demonstrative. In order to make the simplest motor, it will take a certain amount of time and materials at hand.

Essential elements:
- Battery 1.5V;
- Small magnet;
- Pins;
- Scotch;
- Plasticine.
First of all, it is necessary to make a coil, which will act as a rotor. To do this, wind enamelled copper wire around the battery (6 turns). We thread the ends of the wire into the resulting coil and fix it with knots.
To stiffen the structure, it is better to use a wire cross-section of at least about 5 mm.
We bite off the ends of the coil with pliers (they should turn out to be about 4 cm each). We clean one end of the varnish completely, and the other only on one side (it will act as a breaker).
Next, using scotch tape, attach the pins to the battery contacts. To do this, you just need to attach pins and wrap the battery with tape. Then, a magnet is installed on the battery using plasticine.
Insert the coil into the ears of the pins. In this coil, a magnetic field is generated, due to which the rotating element of the structure rotates. If rotation does not occur, swap the coil contacts.
Speaker magnet, copper wire and lamp for making a lamp
The easiest way to bring a fluorescent lamp to working order is to place it in the electromagnetic field of a conventional magnet, which is used to work in old Soviet speakers.
The device consists of:
- Round magnet;
- Copper wire.
To manufacture this device, you first need to remove the magnet from the speaker. Further, using a hammer, without applying great force, beat off the metal plates from the magnet with light blows.
Note! If the plates do not move away from the magnet, you can soak it for a while in a solvent.
After the plates have been removed from the magnet, it is necessary to clean it from dirt. To do this, use a regular rag or rag.
Next, the winding is made. For this, a piece of copper wire is taken in isolation. The wire should be long enough to fold it in half and wrap the magnet in five turns. The double end of the wire is threaded into the resulting wire eyelet.
After the magnet has been wrapped, an ordinary fluorescent lamp is inserted into the central part of the magnet. This structure can be equipped with decorative materials and used as a stand-alone lamp.
The best homemade magnet
The use of magnets in everyday life is so wide that it will take a long time to list them all. But since many are rather entertaining, let us dwell in more detail on the list of widely used ones.
Magnets use:
- During installation work;
- Washing windows;
- As holders.
First of all, it should be noted that finding magnets is not a very difficult task. The small magnets you will find in old headphones. More powerful neodymium magnets can be removed from old computer hard drives.

Let's say you are working with a wooden structure. In one hand you hold a hammer, and in the other an element of this structure. In this case, it is not very convenient to hold an armful of nails. To do this, you just need to place a magnet in your chest pocket and glue nails to it.
There are situations when you have to tighten the screws in hard-to-reach places where it is not possible to hold the screw. To do this, simply attach the magnet to the metal part of the screwdriver. The magnetized screwdriver allows you to hold the bolt or self-tapping screw on its own.
If you glue small magnets to your computer desk (in any convenient place), you can use them as holders for various USB or other types of wires. To do this, small springs are put on the wires (you can use the springs from the handles), which are a metal magnetized structure.
The force of attraction of a magnet depends not only on its size, but also on the time of its operation.
As an integral element of the decor, magnets can be used as fasteners for the puzzle located on the refrigerator door. For this, any photograph is taken, which is drawn into certain elements. A small magnet is glued to each element using ordinary glue. The photo is divided into its constituent elements. After that, it is assembled on the refrigerator door in the form of a puzzle.
What can be done from a battery (video)
In order to assemble an almost eternal electric motor at home, ingenuity and ordinary knowledge in the field of electrical engineering are enough. Which in some cases will undoubtedly be useful to you.
Along with permanent magnets, since the 19th century, people began to actively use variable magnets in technology and everyday life, the work of which can be regulated by supplying an electric current. Structurally, a simple electromagnet is a coil of electrical insulating material with a wire wound around it. With a minimum set of materials and tools, an electromagnet is not difficult to make yourself. We will tell you how to do it in this article.
When an electric current passes through a conductor, a magnetic field arises around the wire; when the current is turned off, the field disappears. To enhance the magnetic properties, a steel core can be introduced into the center of the coil or the amperage can be increased.
The use of electromagnets in everyday life
Electromagnets can be used to solve a variety of problems:
- for collecting and removing steel filings or small steel fasteners;
- in the process of making various games and toys together with children;
- for electrifying screwdrivers and bits, which allows the screws to be magnetized and facilitates the process of screwing them;
- for carrying out various experiments on electromagnetism.
Making a simple electromagnet
The simplest electromagnet, quite suitable for solving a small range of practical household tasks, can be made by hand without using a coil.
For work, prepare the following materials:
- steel rod with a diameter of 5-8 millimeters or a nail per 100;
- copper wire in lacquered insulation with a diameter of 0.1-0.3 millimeters;
- two pieces of 20 centimeters of copper wire in PVC insulation;
- insulating tape;
- source of electricity (battery, accumulator, etc.).
From the tools, prepare scissors or nippers (side cutters) for cutting wires, pliers, a lighter.

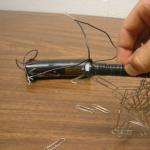
The first stage is the winding of the electric wire. Wrap several hundred turns of thin wire directly onto the steel core (nail). To carry out this process manually for a long time. Use the simplest winding device. Clamp the nail into the chuck of a screwdriver or electric drill, turn on the tool and, guiding the wire, wind it. Tie pieces of wire of larger diameter to the ends of the wound wire and insulate the contact points with insulating tape.

When operating the magnet, it remains only to connect the free ends of the wires to the poles of the current source. The polarity distribution of the connection does not affect the operation of the fixture.

Using the switch
For ease of use, we propose to slightly improve the resulting scheme. Two more items should be added to the above list. The first is the third PVC-insulated wire. The second is a switch of any type (key, push-button, etc.).
Thus, the electromagnet connection diagram will look like this:
- the first wire connects one contact of the battery to the contact of the switch;
- the second wire connects the second contact of the switch with one of the contacts of the electromagnet wire;

the third wire closes the circuit, connecting the second contact of the electromagnet to the remaining contact of the battery.
Using the switch, turning on and off the electromagnet will be much more convenient.
Coil based electromagnet
A more complex electromagnet is made on the basis of a coil made of electrical insulating material - cardboard, wood, plastic. In the absence of such an element, it is easy to make it yourself. Take a small tube made of the indicated materials and glue a pair of washers with holes to it at the ends. It is better if the washers are located at a small distance from the ends of the coil.
The electromagnet is a very useful device that is widely used in industry and in many areas of human activity. Although this device may seem complicated in its design, it is easy to manufacture and a small household electromagnet can be made at home from improvised means.
Let's see the process of creating this homemade product in the video:
In order to make a small electromagnet at home, we need:
- Iron nail or bolt;
- Copper wire;
- Sandpaper;
- Alkaline battery.


At the very beginning, it should be noted that it is not advisable to take too thick wire. A copper wire with a diameter of one millimeter is perfect for a future electromagnet. As for the size of the nail or bolt, a length of 7-10 centimeters is ideal.


So, let's start making a mini electromagnet. First, we need to wind the copper wire around the bolt. It is important to pay attention to the fact that each turn fits snugly against the previous one.

You need to wind the wire so that a piece of wire remains at both ends.

It remains only to connect our wires to the source, namely the alkaline battery. After that, our bolt will attract metal elements.


The operating principle of an electromagnet is very simple. When an electric current passes through the core coil, a magnetic field is generated, which attracts the metal elements. The power of the electromagnet depends on the density of the coil and the number of layers of copper wire, as well as on the strength of the current.
The other day I showed a child how an electric motor works. I remembered a physics experiment from school.
Source materials:
- AA battery
- Enameled wire 0.5 mm
- Magnet
- Two paper clips, about the size of a battery
- Stationery tape
- Plasticine

We bend part of the paper clip. 
We wind a coil of enameled wire. We make 6-7 turns. We fix the ends of the wire with knots. Then we clean it. We completely clean one end of insulation, and the other only on one side. (In the photo, the right end is stripped from below) 
We fix the paper clips on the battery with tape. Install the magnet. We fix the entire structure on the table using plasticine. Next, you need to put the coil correctly. When the spool is installed, the stripped ends should touch the paper clip. A magnetic field appears in the coil, we get an electromagnet. The poles of the permanent magnet and the coil must be the same, that is, they must repel. The repulsive force turns the coil, one end loses contact and the magnetic field disappears. By inertia, the coil turns, contact reappears and the cycle repeats. If the magnets are attracted, the motor will not spin. Therefore, one of the magnets will need to be turned over. 
We also recommend
 How to make an electromagnet Motor from battery wire and magnet
 How to find the area of \u200b\u200ba right triangle in an unusual way Area by hypotenuse and leg
 DIY plaster vases: the easiest way to make
 What is a perimeter and its application in practice
 Why waves at sea? How do waves appear? How a sea wave is formed
 What is liver - step by step recipes for cooking with photos